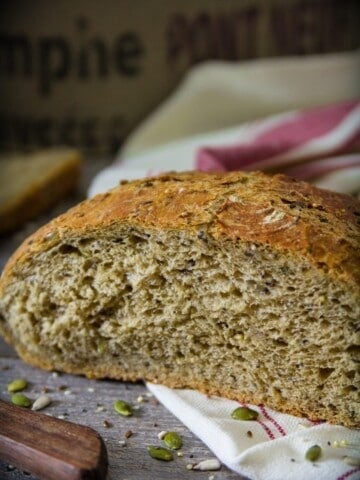
This Sourdough Bread Recipe is not as hard as you think. Let me walk you through how to make the perfect loaf, with a crackly crust and chewy crumb.
If you love fresh homemade bread, then you should try this amazing Focaccia Bread recipe or Buttery Brioche Bread recipe.

Table Of Contents
Sourdough Bread Recipe Details
I can’t get enough of the flavor in this Sourdough Bread Recipe. And I just love how great it makes my house smell as it bakes. I’m sure you’re going to love this classic loaf as much as I do!
- TASTE: This bread has a deliciously mild tangy taste that’s unique to sourdough. The yeasty loaf pairs well with salty and sweet flavors.
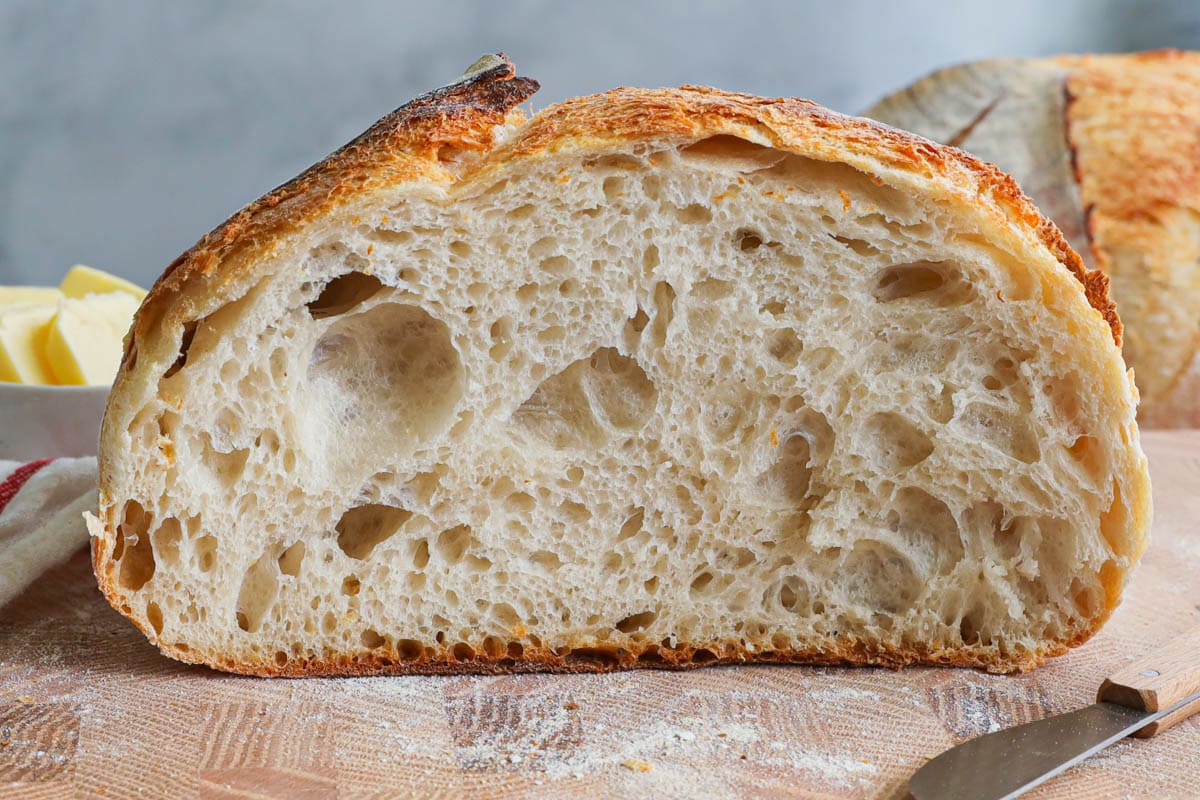
- TEXTURE: You’ll love the hard and crackly crust on the outside of the sourdough, while the inside is chewy and springy.
- TIME: This recipe will take some time at just over 16 hours. But it’s worth it!
- EASE: If you follow along with my step-by-step instructions and images, this homemade sourdough recipe will come off without a hitch.
What You’ll Need
Ingredient Notes
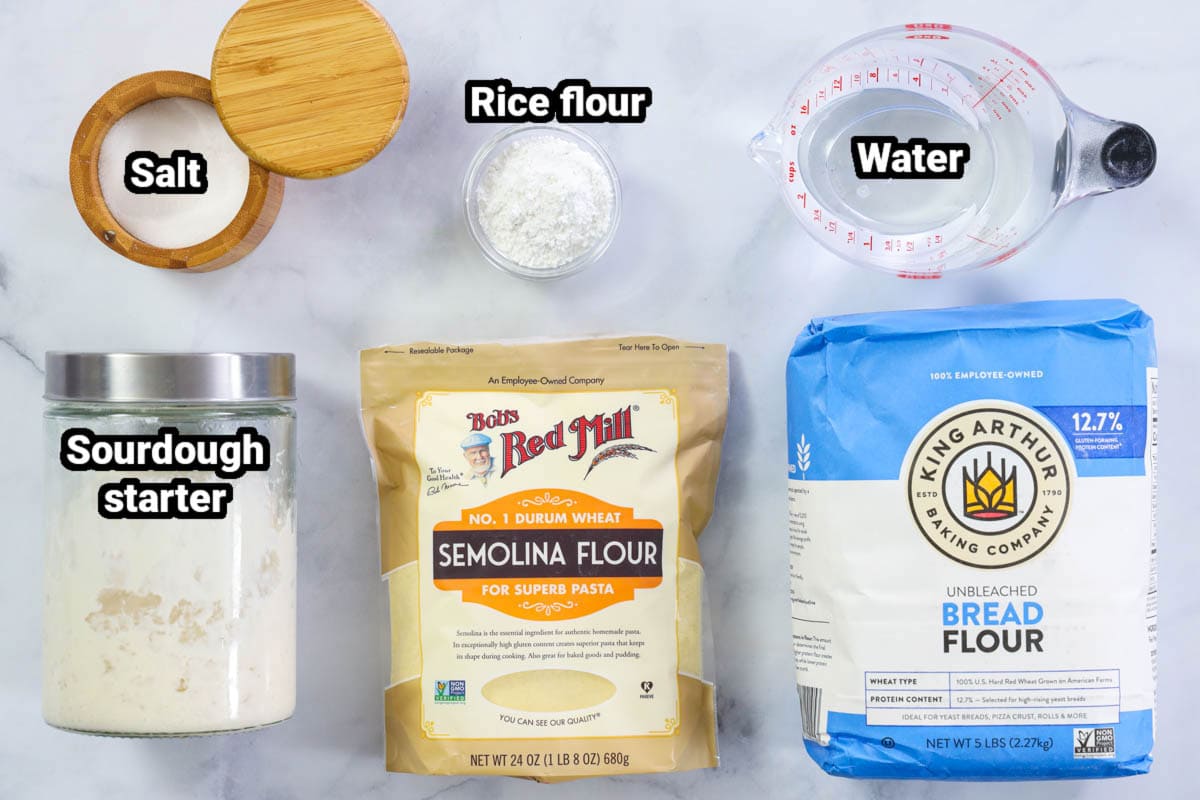
- Sourdough starter- I purchased mine from Ballerina Farm’s website. This is a mix of lactic acid bacteria and wild yeast that feeds on carbs in the flour and water added to it to create a tangy loaf of sourdough bread.
- Bread flour– This type of flour has more protein in it than others, so it can produce more gluten, making bread chewy and springy.
- Water- This moistens the dough and feeds the sourdough starter to make your bread. Make sure it’s warm enough, between 105 and 110 degrees.
- Salt- This adds important flavor to the bread. Fine granules are best.
- Flours for dusting- We’ll use Rice Flour and Semolina Flour for dusting the loaf and proofing basket so the dough doesn’t stick.
- Dutch oven pot- This cast iron pot helps the Sourdough Bread create its hard outer crust. It can go right into the oven for baking.
- Kitchen scale– This will be a big help in keeping your measurements exact. Using weight is a more accurate way of measuring ingredients.
- Proofing basket– While you can use a bowl and towel, this is helpful for proofing the bread before baking. Either way works though.
- Blade– You’ll need this to score the top of the loaf before baking. This is important for helping the bread expand in a controlled way.
Add-ins and Substitutions
- Substitute whole grain bread flour- Instead of white bread flour, use whole wheat flour for a tangier, more sour taste in your loaf.
- Add seeds and nuts- You can incorporate anise, allspice, chopped walnuts, pepitas, chia seeds, or sesame seeds into your dough before baking.
- Make it with dry milk powder- For a softer texture and added flavor, mix some dry milk powder into the dough.
- Add herbs- Try this Sourdough Bread recipe with some fresh or dried chives, rosemary, dill, or marjoram.
How to Make Sourdough Bread
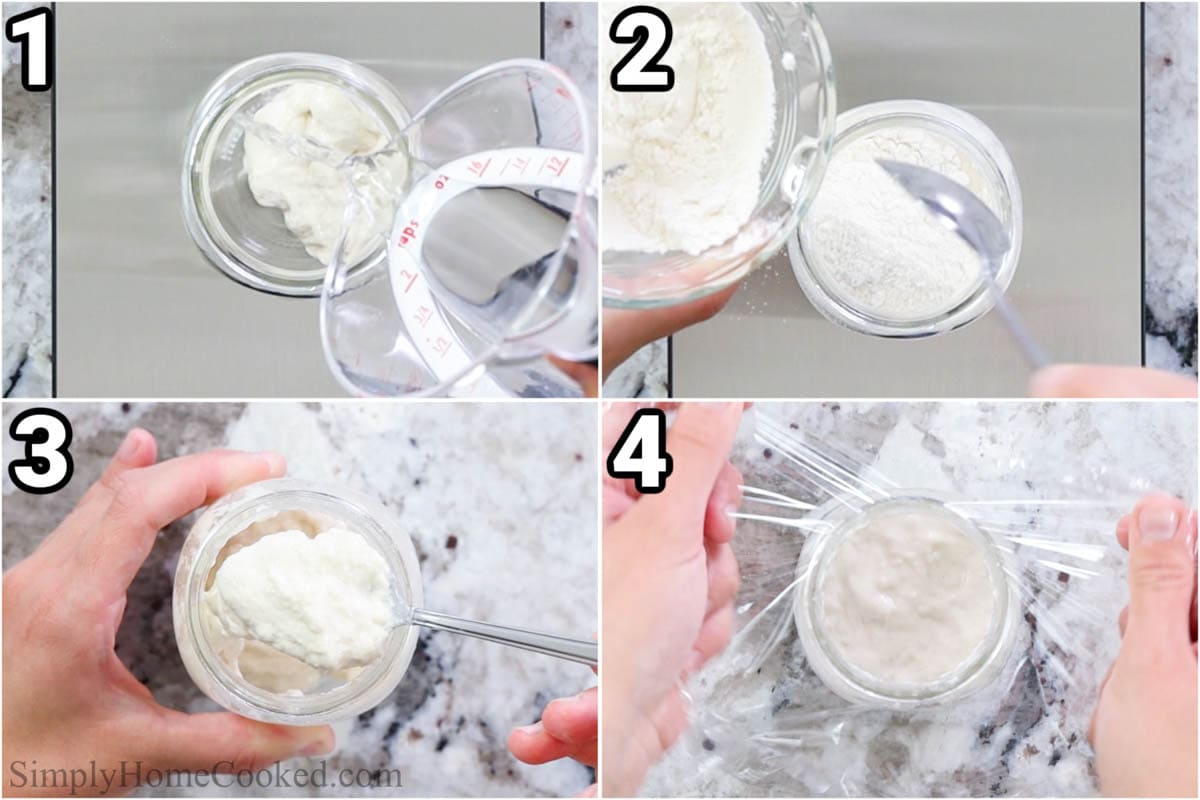
- Feed the starter. About 4-8 hours before you begin, feed the sourdough starter. You’ll want it to double in size. Mix the starter with the water in a mason jar, then add the bread flour. Mix until no more patches of flour are visible. Cover with plastic wrap.
Pro Tip: If you prefer your bread less sour, keep the starter in the fridge. It will slow down the fermentation and create a very mildly sour flavor in the bread.
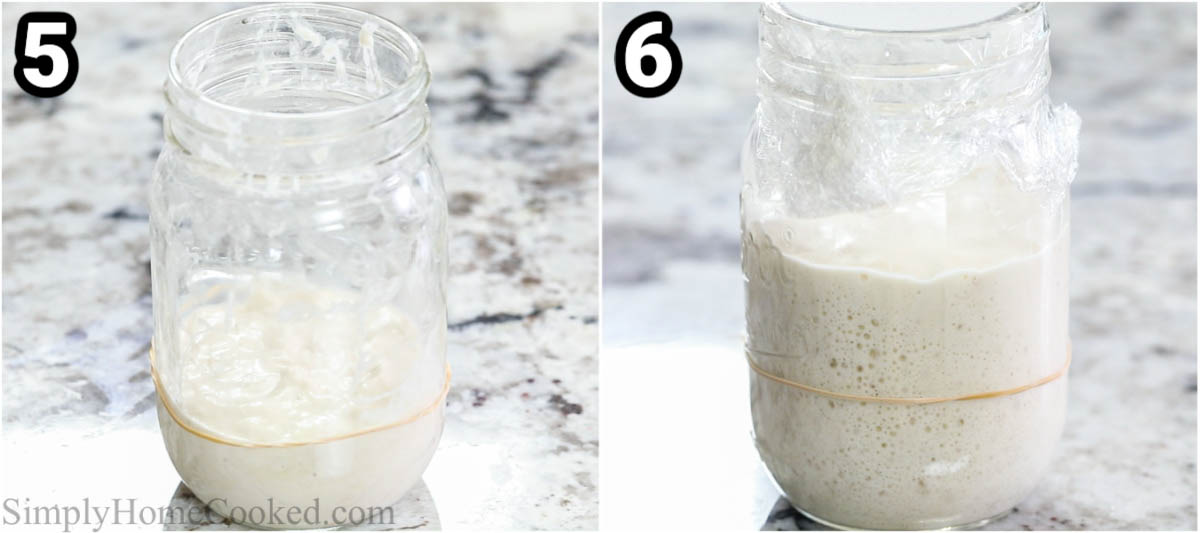
- Let it double. Allow the starter to sit at room temperature until it activates and doubles in size. It should look very bubbly at this point.
Pro Tip: To determine if the sourdough starter has doubled, I usually place a rubber band around the mason jar where the starter stops to gauge its growth.
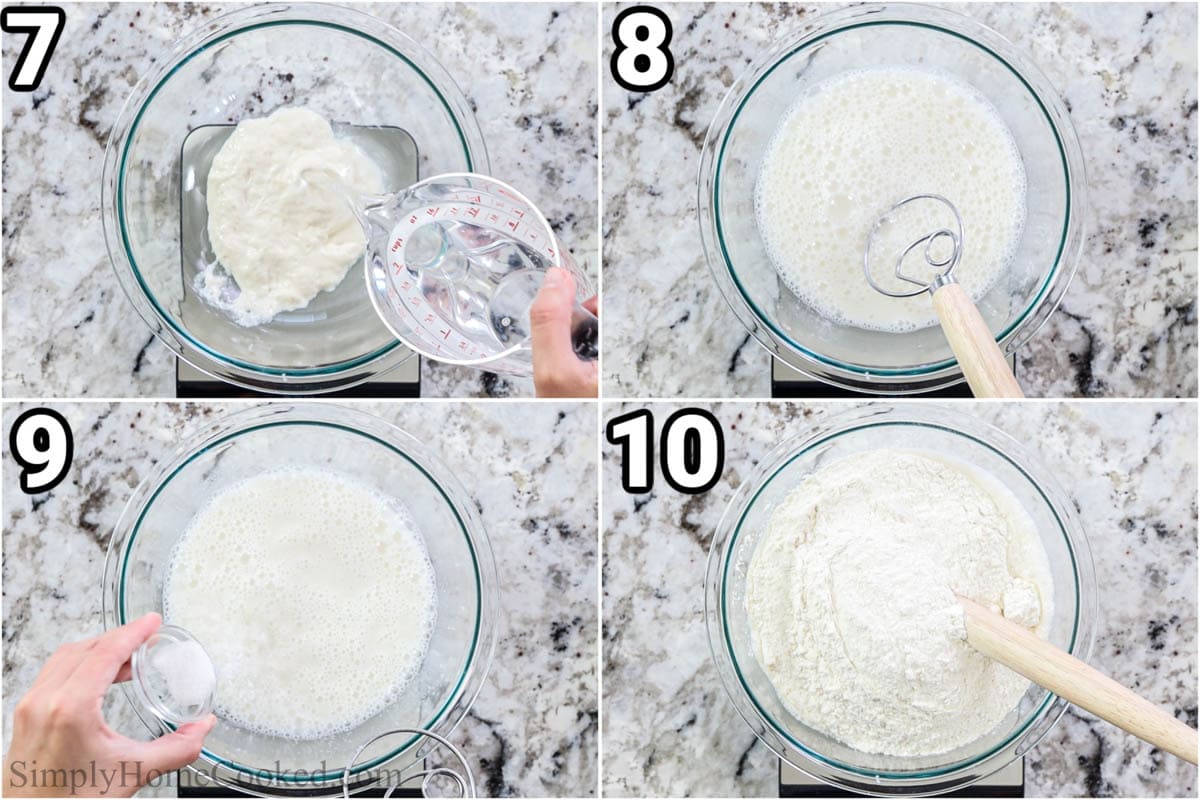
- Add the ingredients together. In a large bowl, mix the warm water and active starter together, then add the salt and bread flour. I love using a dough whisk for this part.
- Proof the dough. Cover it with plastic wrap and let the dough rest for 30 minutes in a warm place, or in your oven on the proof setting.
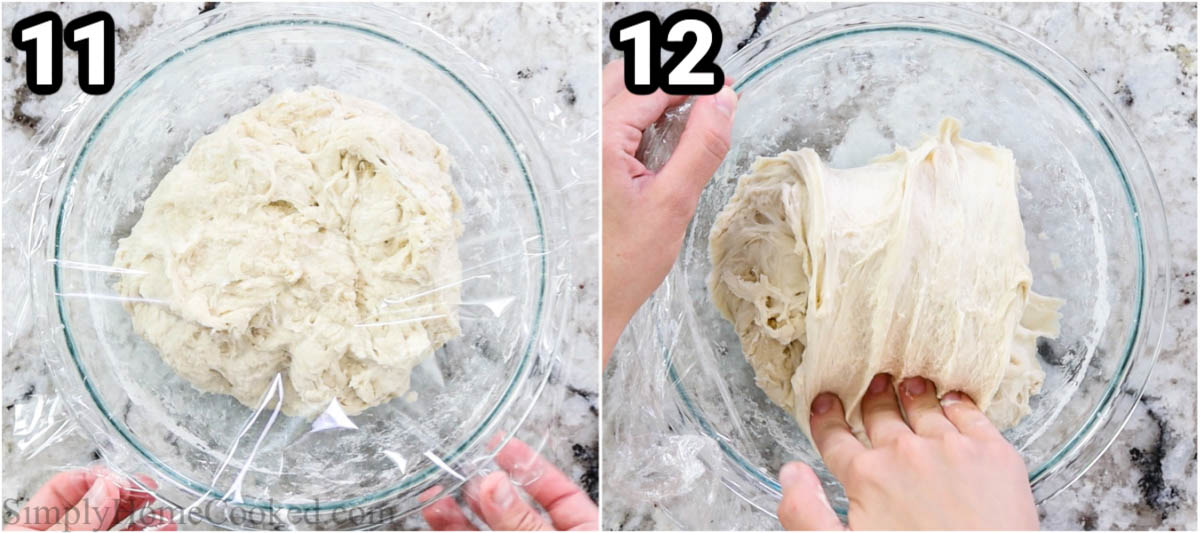
- Stretch the sourdough bread dough. Without removing the dough from the bowl, pull the top into the center, then the left side into the center, then the bottom, and finally the right side (basically, pull in all the sides). Then cover the bowl with plastic wrap and let it rest for 30 more minutes at room temperature.
- Stretch the dough some more. After the 30 minutes have passed, repeat the same stretching process 5 more times with 30 minutes in between, totaling 6 stretches.
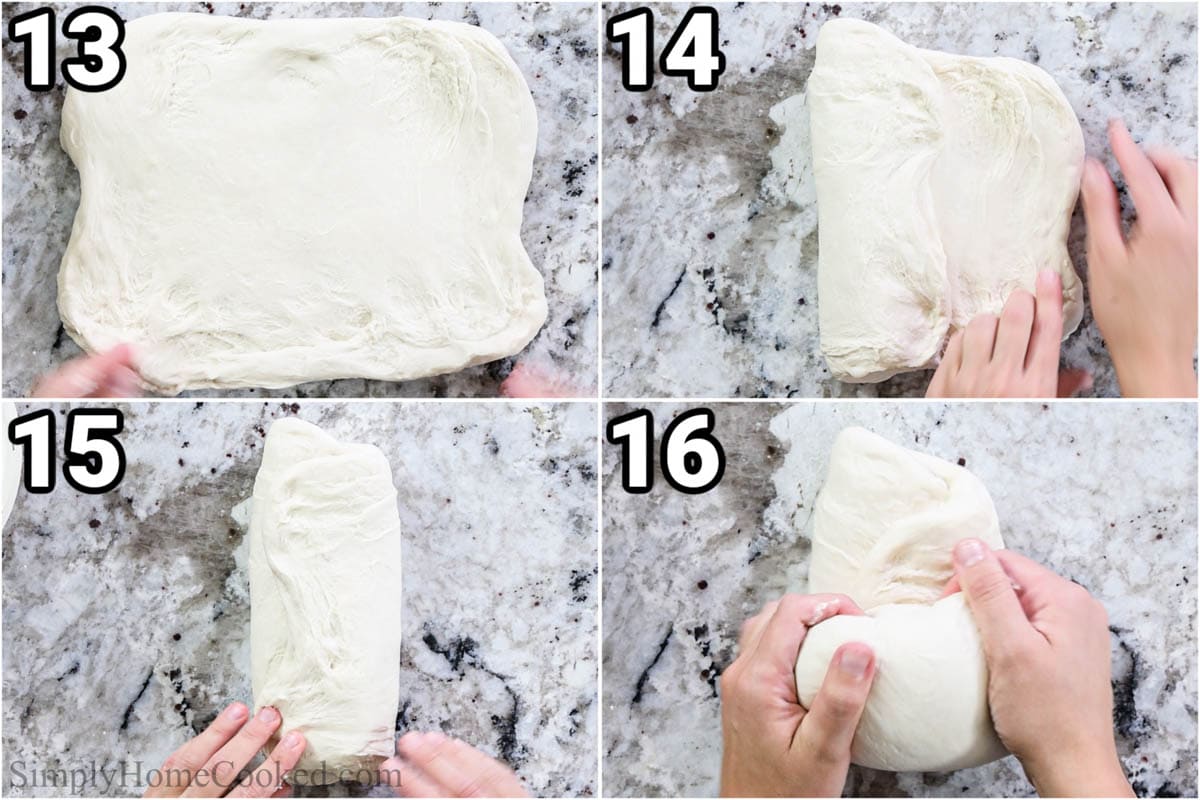
- Fold and shape the dough. After the last stretch, place the dough on a clean work surface or counter and stretch it into a small rectangle. Now, fold it into thirds and roll it up so the seam is on the inside. Then use your hands to shape the dough into a round ball by turning it on your work surface multiple times.
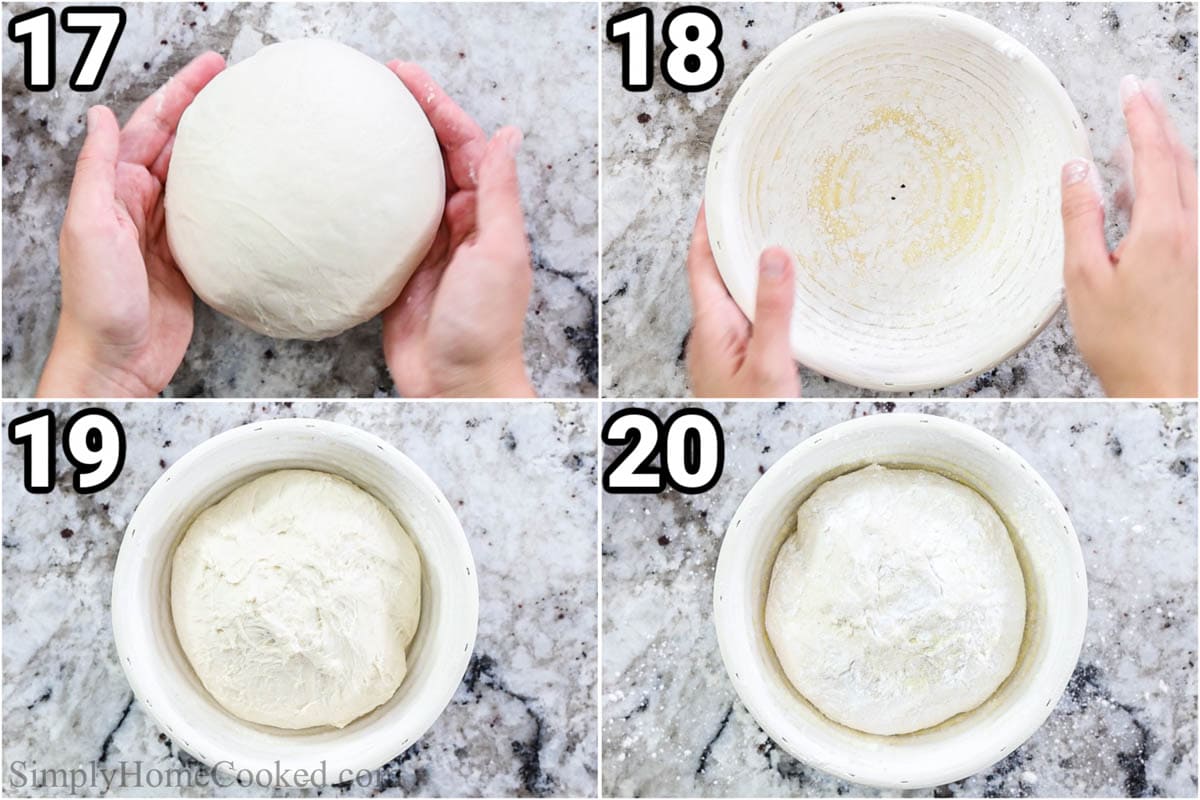
- Chill it in the refrigerator. Now thoroughly dust your bread-proofing basket with some rice flour and semolina flour, but not bread flour as it will make the dough stick to the basket. Place the dough into the bread-proofing basket, seam side down, and dust with a little more semolina and rice flour. Then cover and chill in the fridge for 8 hours or overnight.
Pro Tip: If you are using new bread-proofing baskets, make sure to spray them down with water and apply a generous amount of rice flour and let them dry for about 1 hour before using.
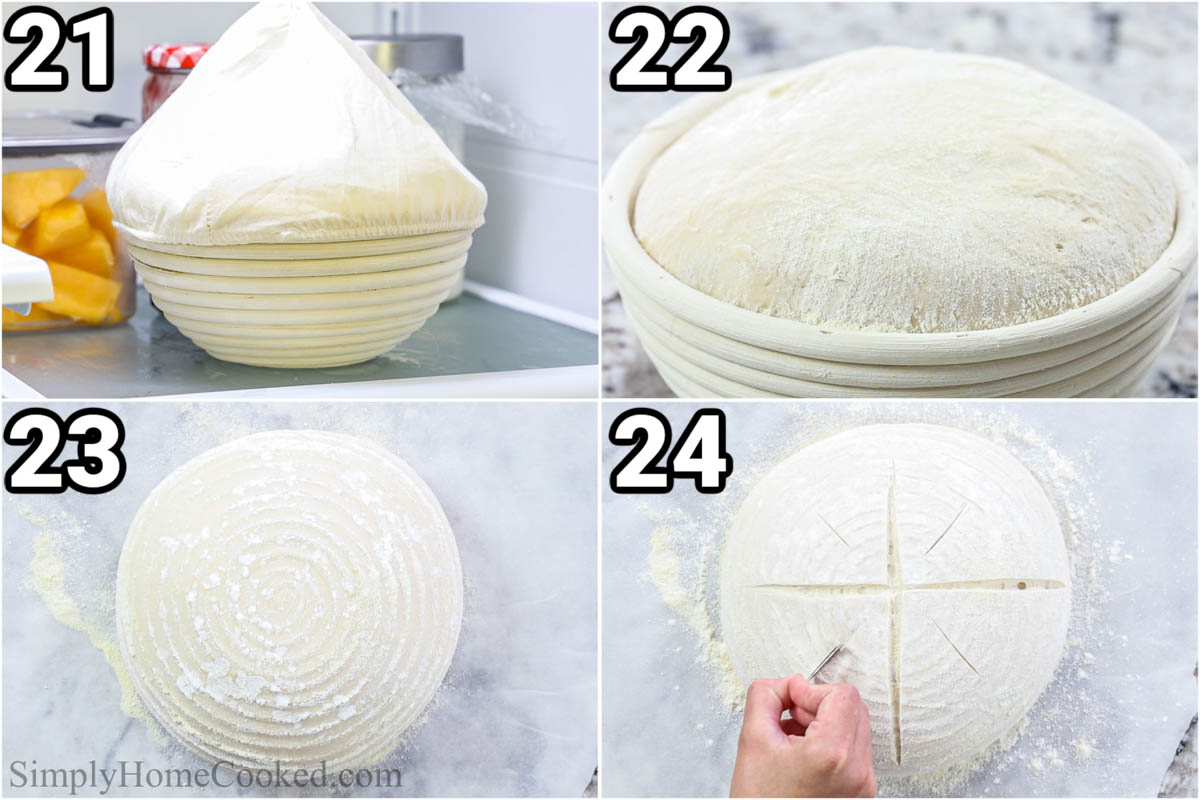
- Let the dough come to room temperature. In the morning, take the bread dough out of the fridge and let the bread dough rise and come to room temperature for about 3 hours.
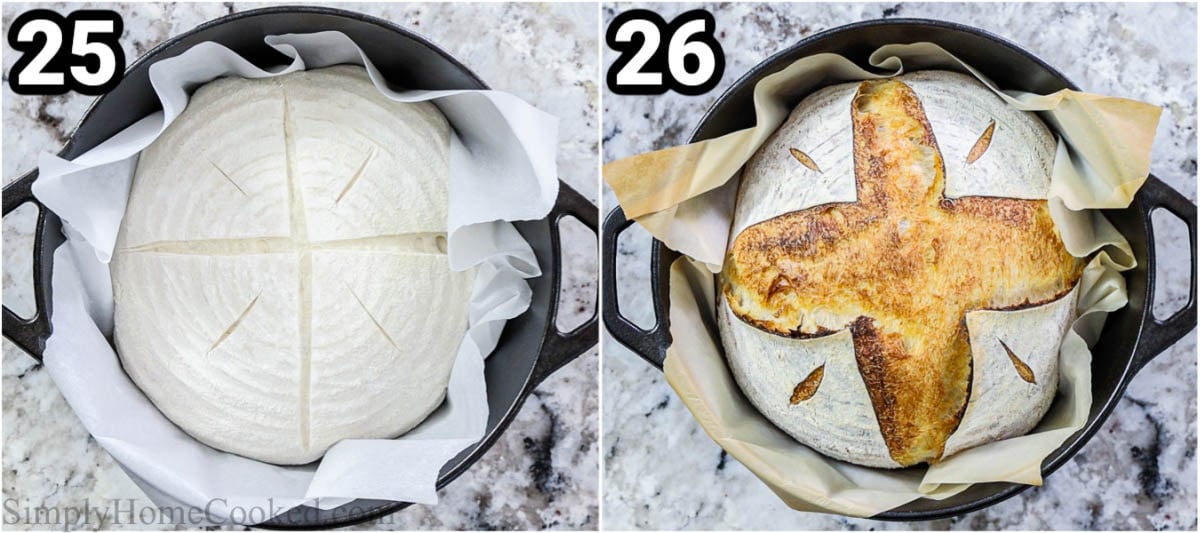
- Score the bread. Place an empty Dutch oven pot (with lid) in the oven and let it preheat to 450 degrees Fahrenheit. Then flip the bread dough onto a sheet of parchment paper and use a blade or sharp knife to make a few slits or designs on top of the dough. Scoring it will control where the air will expand.
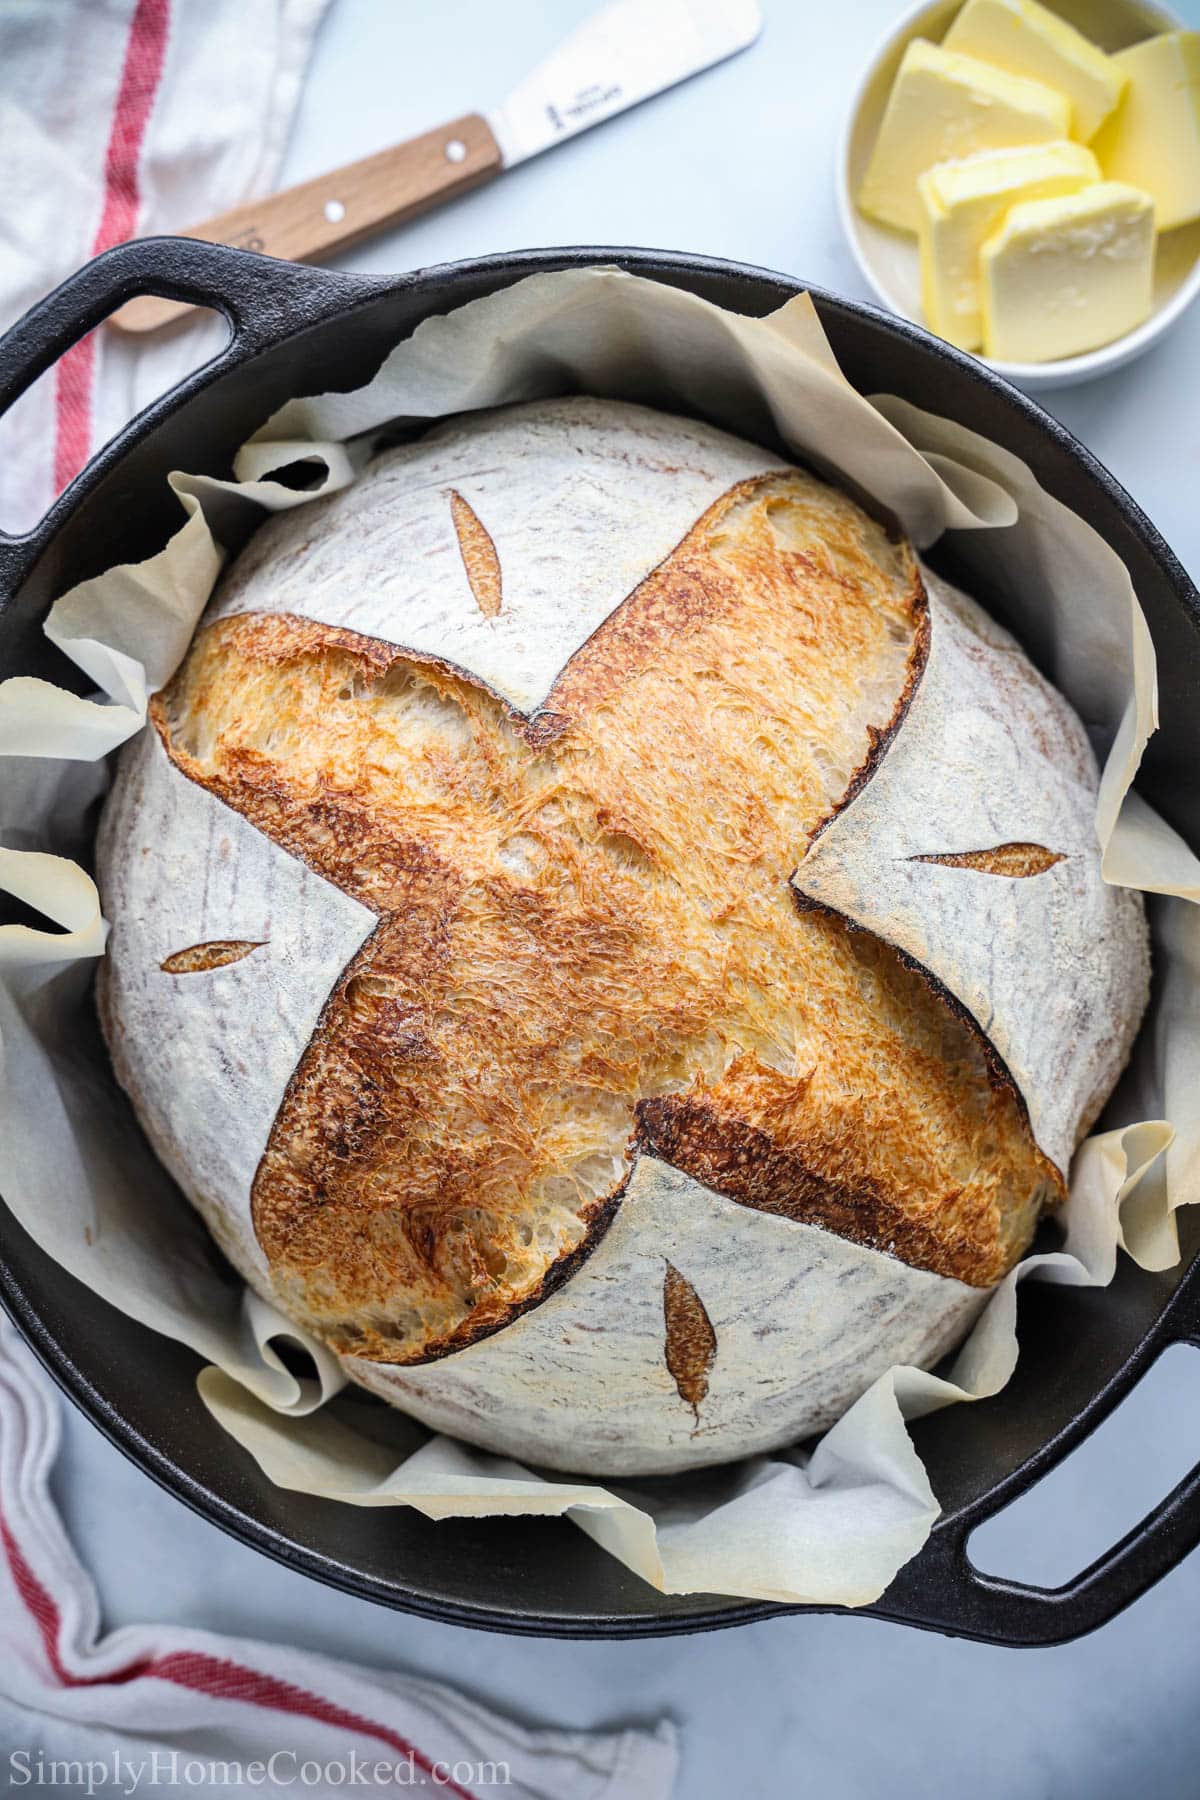
- Bake. Then carefully place it inside the hot Dutch oven pot and put the hot lid on top. Bake it covered for 30 minutes, then uncovered for 15-20 minutes. Let it cool before slicing.
Recipe Tips
- Use a kitchen scale- Weight measurements are more accurate than volume because you can overpack the measuring cup with flour. Use a kitchen scale to get the amounts perfect.
- Make double- If you want to bake 2 loaves, you’ll need to feed double the amount of starter, so 100g each of water, flour, and starter
- Do not skip the stretching– This is very important for sourdough. With each dough stretch, you will notice it getting stronger and stronger. Building the strength of the dough will help it hold its shape when it bakes.
- Use a proofing basket alternative- If you do not have a proofing basket, you can line a glass bowl with a kitchen towel and dust it with rice flour and semolina instead.
FAQs
Sourdough is actually a pretty healthy bread choice. Made with no sugar, it contains a lot of vitamins and minerals, like iron, folate, b12, magnesium, calcium, and so much more. This is a great choice for your morning toast or lunchtime sandwich.
The secret lies in the sourdough starter. This bread doesn’t use commercial yeast to make it rise, but rather the fermentation that happens when the starter is mixed with bread flour and water. This also gives it its signature tangy flavor and extra chewy texture.
Serving Suggestions
This Sourdough Bread Recipe is so versatile. You can eat it on its own or use it for sandwiches, soups, or as a side to different meats. Here are some delicious ideas to try.
- Meats: Serve slices or hunks of this delicious loaf of bread alongside Braised Beef Short Ribs (VIDEO), Smoked Chicken Thighs, and Beef Stew.
- Sandwiches: Use this Sourdough Bread for sandwiches like this Grilled Cheese Sandwich, Grilled Caprese Sandwich, or Breakfast Sandwich.
- Soups: Dip it into bowls of tasty Copycat Panera Bread Broccoli Cheddar Soup, Tortellini Soup, Baked Potato Soup, or Easy French Onion Soup.
- Toppings: Spread butter, homemade Strawberry Jam (no pectin), Nutella, or Chocolate Ganache on a toasted slice for a sweet or savory breakfast.
Make This Recipe in Advance
Make ahead: You can make this dough a day ahead by placing it in the fridge while it’s rising. When you take it out, let it come to room temperature to finish its rise before continuing with the recipe and baking it.
Storing: Store any leftover Sourdough Bread by wrapping it in plastic wrap and keeping it at room temperature. It should remain soft for up to 5 days.
Freeze: You can also freeze the loaf by slicing it in half and placing it in a gallon-sized ziplock bag and then putting it in a freezer. It should last for 3 months. Defrost overnight in the fridge.
More Delicious Breads!


Watch Video Recipe Here
Full Recipe Instructions

Sourdough Bread Recipe
Equipment
- 1 Blade
Ingredients
- 350 g water 105° F
- 100 g active Sourdough starter
- 600 g bread flour
- 12 g salt
- Rice flour for dusting
- Semolina flour for dusting
Instructions
- Feed starter 4-8 hours before using. I purchased mine from Ballerina Farm. The time it takes to rise will depend on how warm your house is. You want it to double in size. Use a kitchen scale to feed the starter in a mason jar by mixing 50g starter and 50g warm water and mix using a wooden spoon to loosen it up. Then add 50g of bread flour and mix until no more patches of flour are visible. Cover with plastic wrap and let it sit at room temperature until it activates and doubles in size. I usually place a rubber band around the mason where the starter stops to gauge the growth. The starter should look very bubbly at this point. (Tip: if you want to bake 2 loaves, you’ll need to feed double the amount of starter. So 100g of each water, flour, and starter).
- In a bowl, mix 350g warm water no higher than (110°F) with 100g of active starter. Then add 12g salt and mix in 600g bread flour. I love using a dough whisk and scraper for this step.
- It will look shaggy and dry and that’s ok. Cover with plastic wrap and rest for 30 mins in a warm place. I like to use the proof setting on my oven for this step.
- Now begin the stretching process. Without removing the dough from the bowl, pull the top into the center, then the left side into the center. Then the bottom and right sides into the center. So pretty much pull in all the sides of the dough. Then cover with plastic wrap and let it rest for 30 more minutes at room temperature.
- After the 30 minutes have passed, repeat the same stretching process 5 more times with 30 minutes in between. So a total of 6 stretches. Do not skip the stretching. This is very important for sourdough. With each stretch, you will notice the dough getting stronger and stronger. Building the strength of the dough will help hold its shape when it bakes.
- After the last stretch, place the dough on a clean work surface and stretch it into a small rectangle (doesn’t matter how big). Now, fold it into 3rds and roll it up so the seam is on the inside. Then use your hands to shape the dough into a round ball by turning it on your work surface multiple times.
- Now thoroughly dust your bread-proofing basket with about 1 Tbsp of rice flour and 1 Tbsp semolina flour. Note: dusting with bread flour will not work. The dough will stick to the bread basket. Place the dough into the bread-proofing basket and dust with a little more semolina and rice flour. Then cover and chill the fridge for 8 hours or overnight. Tip: if you do not have a proofing basket you can line a glass bowl with a kitchen towel and dust it with rice flour and semolina.
- In the morning, take the bread dough out of the fridge and let it come to room temperature for about 3 hours.
- Place an empty Dutch oven pot (with lid) in the oven and let it preheat to 450 degrees Fahrenheit.
- Carefully flip the bread dough onto a sheet of parchment paper. Use a blade to make a few slits or designs on top of the bread Scoring the bread will control where the air will expand. Then place it inside the hot Dutch oven pot and put the hot lid on top. Be careful, it will be very hot.
- Bake it covered for 30 minutes, then uncovered for 15-20 minutes. Let the baked bread cool before slicing.
Notes
- If you prefer your bread less sour, keep the starter in the fridge. It will slow down the fermentation and create a very mildly sour flavor in the bread.
- If you are using new bread-proofing baskets, make sure to spray them down with water and apply a generous amount of rice flour and let them dry for about 1 hour before using.
- Use a kitchen scale- Weight measurements are more accurate than volume because you can overpack the measuring cup with flour. Use a kitchen scale to get the amounts perfect.
- Make double- If you want to bake 2 loaves, you’ll need to feed double the amount of starter, so 100g each of water, flour, and starter
- Do not skip the stretching– This is very important for sourdough. With each dough stretch, you will notice it getting stronger and stronger. Building the strength of the dough will help it hold its shape when it bakes.
- Use a proofing basket alternative- If you do not have a proofing basket, you can line a glass bowl with a kitchen towel and dust it with rice flour and semolina instead.
- How to freeze sourdough bread- Slice it in half and place it in a gallon-sized ziplock bag and then put it in the freezer. It should last for 3 months. Defrost overnight in the fridge.

- Sweet Croissant Breakfast Casserole - April 1, 2026
- Sourdough Focaccia Recipe - March 28, 2026
- Egg Roll in a Bowl - March 24, 2026

PAM DIC says
I did exactly as the recipe stated, (and my starter is great), but it never rose. I saw other reviewers had the same problem, but it was never addressed. After it was baked, it tasted good but was heavy and dense. What did I do wrong???
Dina says
Hi Pam, a good healthy starter is the MOST important park of making sourdough bread. There can be many factors as to why your starter never rose. It might have been too hungry and needed more feeding to strengthen it up. Or it might have been to cold in your home and it did not have enough warmth to rise. Or it might have rose to its peak and dropped back down making it weaker again. Let me know if you encountered any of these issues and I can try to help you troubleshoot.
S Clark says
Perfect! I’m new to sourdough.. started my starter in October and it’s finally perfect.. I’ve tried 3 other recipes that failed miserably. I had high hopes for this one after watching the video on YouTube. Turned out to be the best loaf ever. Will forever follow this recipe! Thank you!
Dina says
That’s incredible! I am so happy you did not give up and gave this recipe a try. It makes me so happy that this recipe was a winner for you!
Kat says
This dough feels amazing while shaping. I get so many bubbles. I do a blend of all purpose and bread flour. Is there a way I can bake straight from fridge? I find when I let it come to room temperature, it either spreads out while scoring or it’s hard to score
Dina says
Hi Kat, yes you can bake straight from the fridge too. It will definitely help keep shape and make scoring easier! Let me know if this helps solve your issue 🙂
Tim says
Hi Dina, New subscriber and tried your recipe I put it in the fridge overnight and it didn’t raise. I guess I don’t understand this step because I was told to put starter in fridge to stall it out until you wanted to use it . I’ve been baking sourdough with a different recipe but am trying to get more rise so thought I would try yours.😊
Thanks Tim
Dina says
Hi Tim, thank you for your question. I would not recommend putting the starter in the fridge as it will really slow down if not completely stop it from becoming ripe enough to use for the bread. When feeding a starter before making bread, you want to keep it at room temp so that the fermentation can happen. I hope that helps.
Christina Mundaca says
So is this bulk fermenting happening in the fridge overnight?
Dina says
Hi Christina, yes the bulk fermentation happens overnight in the fridge.
Lynne says
Dina,
JI have just found your recipe and am very keen to try it. Can I use my bread tin instead of a dutch oven and if so, can I reduce the flour to 500gm and the water to 295 gms to fit my loaf tin. I was wanting to use one loaf tin for the bread and another loaf tin on top of it to “mimic” a dutch oven.
Thanks.
Dina says
Hi Lynne, I highly encourage using a cast iron or dutch oven pot. It retains the heat so much better than a metal tin. Having high heat is important for proper baking.
Janet says
Thank you, I’m going to kitchen to try to make
Dina says
Enjoy!
Constance says
Thanks for the recipe, Dina. We’ve used it several times and enjoy it. We are a bit confused about the room temperature instructions. Does that mean just set it out for about 3 hours before you want to bake? Or does it literally mean bringing the dough to room temp? That can take several hours & of course, requires temping it .
Thanks for your help.
Dina says
Hi, great question! It means to just leave the dough out on the counter for an few hours.
Patti says
Thank you a million times! I’ve tried to make sourdough several times and it has always been a flop. I had almost given up hope when I ran across your recipe and directions. Success!!! Thank you again!
Dina says
You are very welcome Patti! Your comment seriously made my day! I know how frustrating sourdough can be in the beginning, so I’m glad you didn’t give up. Thankful that my recipe helped turn your luck around. Thank you so much for leaving such an awesome review! 🙂
KT says
My loaf turned out great!! Best rise, texture, crumb, etc of all the loaves I have made so far. You gave really good instructions.. I made the mistake of not adding enough salt but it was a beautiful loaf! Is there any way to incorporate wheat flour in with the bread flour? I love the flavor this brings to the bread 🙂
Dina says
Hi 🙂 That is so awesome to hear that you loved my sourdough recipe over other recipe! I am very happy to hear that my instructions were easy to follow. Wheat flour has a different gluten percentage. This will alter the liquid ratios. I have not tested this recipe with wheat flour so I can’t say for sure how it will turn out. I hope that helps clarify. Thank you for taking the time to leave your kind review! 🙂
Valorie says
So much easier than other recipes I’ve tried! My family loved it
Dina says
That is so awesome to hear Valorie! Glad to hear your whole family loved this sourdough bread! Thank you so much for giving this recipe a try and for your kind words. 🙂
Sylvie says
I just baked the sourdough bread. I followed the recipe and it is the best bread I ever made. Love the simplicity!
Thank you
Dina says
That makes me so happy to hear Sylvie! Thank you so much for trying this sourdough recipe and for your kind words! 🙂
JLY says
I have made several different recipes but always come back this one. Excellent sourdough bread.
Dina says
I am so glad that you love this recipe so much! Thank you for coming back here and giving me such kind feedback. I really appreciate it!
Noreen says
I love this bread recipe so much! I added and laminated jalapenos and cheese to the dough right after I shaped it into a rectangle, rolled it up, and placed it in my banneton. Overnight in the fridge and baked as directed. I wish I could post a picture, the cheesy jalapeno swirl in the cut was so pretty, and the taste was delicious! Thank you for this foolproof recipe
Dina says
That sounds amazing Noreen! Thank you for the feedback 🙂
Larissa says
Hello!
I love the taste of this recipe, but every time I have tried it my loaf has never risen in the fridge…
I read another comment where someone had a similar problem, and you suggested feeding the starter a few more times. I did this, and the starter did change its consistency so I was hopeful that my latest loaf would be different, but unfortunately there was still no rise by the next morning. The only way I was able to get a decent loaf was to take it out of the fridge in the morning and let it sit out basically all day (around 8-9h). Then it rose a little, but not like in your video.
I am new in my sourdough journey, but when I have left it out the loaves have been really really nice and soft, so I am just so confused as to why the loaf is not rising in the fridge overnight like it should be 🥲 I tried changing the temperature in the fridge (both cooler and warmer), and I also tried leaving it out for a little bit after shaping and placing into the basket to see if that might kickstart the rise, but neither worked 😭
Any tips would be greatly appreciated!!!
Dina says
Hi Larissa, really great question! The dough will only rise very little on the fridge. Due to the cold temperatures, it slows down fermentation. So its totally fine if it does not rise a lot in the fridge. It will do its final rise at room temp before baking. This rise time can vary depending on how warm it is in your house. I hope the helps 🙂