These 4-ingredient Oreo Truffles are so indulgent and delicious, yet very easy to make! Chocolatey, rich, and moist, you’ll definitely want to make these for your next get-together.
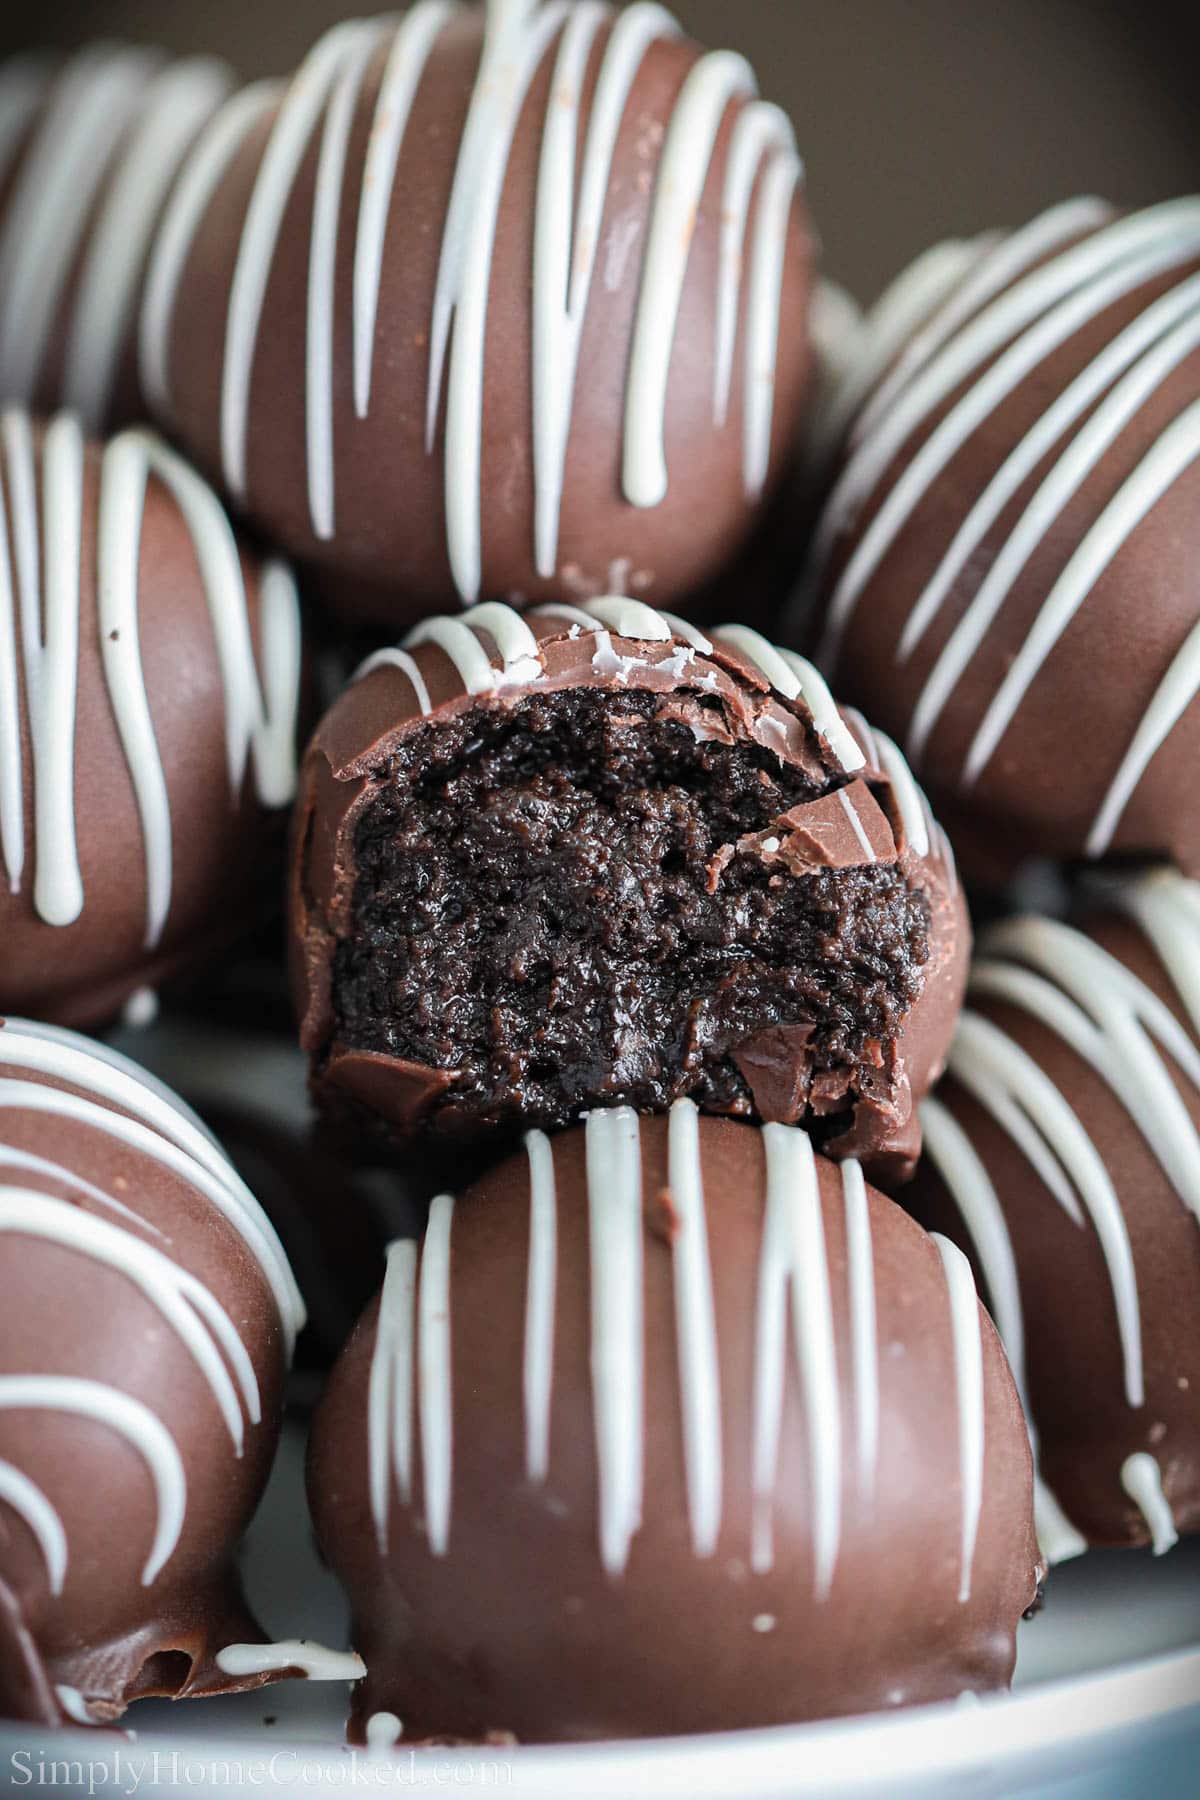
Table Of Contents
Recipe Details
Once you sink your teeth into these delicious Oreo truffles, you will know why everyone is so obsessed with them. They are a chocolate lover’s dream treat! I love serving them at parties and giving them as gifts. They’re so decadent!
- TASTE: The Oreos have a classic chocolatey flavor that goes so well with the tart cream cheese. And the chocolate covering is perfectly sweet.
- TEXTURE: The inside of the truffle is soft, fudgy, and moist. The outer shell has a semi-hard chocolate shell that is so satisfying to bite into.
- TIME: This recipe comes together quite fast since there is no baking required!
- EASE: Everything about this super simple. After a few truffles, you will be a pro!
What You’ll Need

Ingredient Notes
- Oreos– Make sure to use the regular ones and NOT the double stuff kind. The extra filling will change the consistency of the truffle making it too soft to work with.
- Candy melts– You can use any kind of candy melts you have on hand (like Wilton brand), but I highly recommend getting the Ghirardelli. It has the best melting consistency and is very easy to work with.
- Cream cheese- Use full-fat cream cheese to get the right rich and creamy consistency in the Oreo truffles.
Add-ins and Substitutions
- Add flavors– You can peppermint, orange, or rum extract for a burst of holiday flavor.
- Add nuts– For extra crunch, you can mix in chopped pecans, almonds, or walnuts into the Oreo truffle “mixture.”
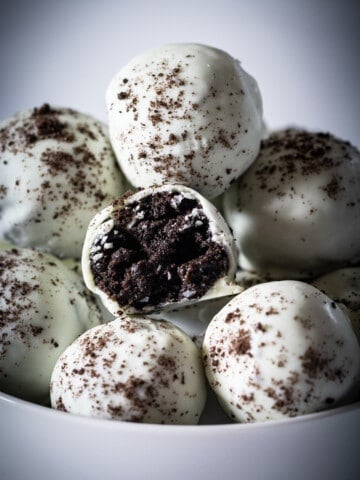
- Toppings– You can always add finely crushed Oreos on top. Another great topping would be chopped nuts or finely crushed freeze-dried fruit like raspberry or strawberry. For Christmas time, try adding crushed candy canes on top too!
- Make it Gluten-free- You can buy gluten-free Oreos so anyone with gluten intolerance can indulge in these!
How to Make Oreo Truffles
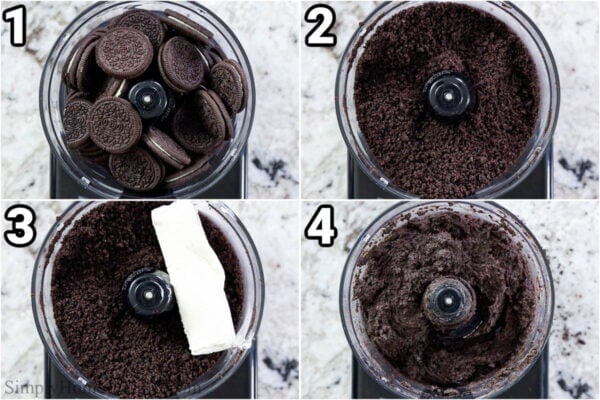
- Make the cookies into crumbles. Place the Oreo cookies (including the filling) into a food processor. then pulse a few times at high speed or until the Oreos are crushed up to a very fine crumb.
- Add cream cheese. Then add the softened cream cheese inside and mix at high speed again, until the cream cheese and Oreos are well combined.

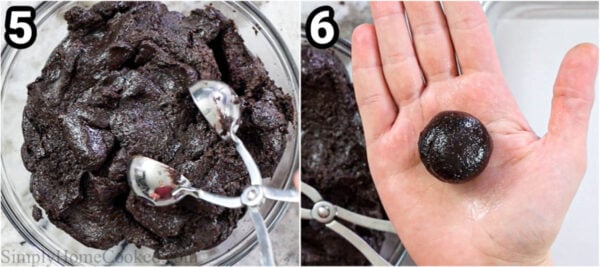
- Roll the mix into balls. Now use a medium-sized cookie scoop or a cake baller to scoop out even amounts of Oreo mixture. Then place it into your hand and roll it out to a ball.

- Freeze them. Then transfer to a baking sheet lined with parchment paper. Once all of the Oreo truffles are shaped, transfer them to the freezer and freeze them for 15 minutes.
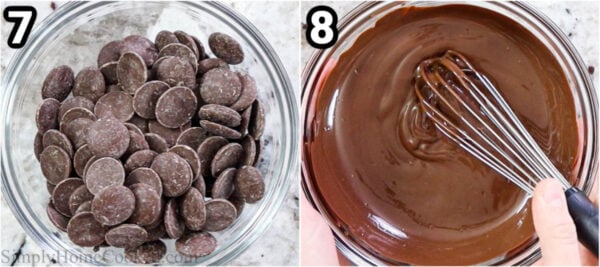
- Melt the chocolate. In the meantime place 10 ounces of chocolate candy melts into a microwave-safe bowl and melt the chocolate in 20-second intervals with mixing in between.
Pro Tip: Microwave the candy melts in small increments to avoid scorching the chocolate. You don’t want to overheat it.

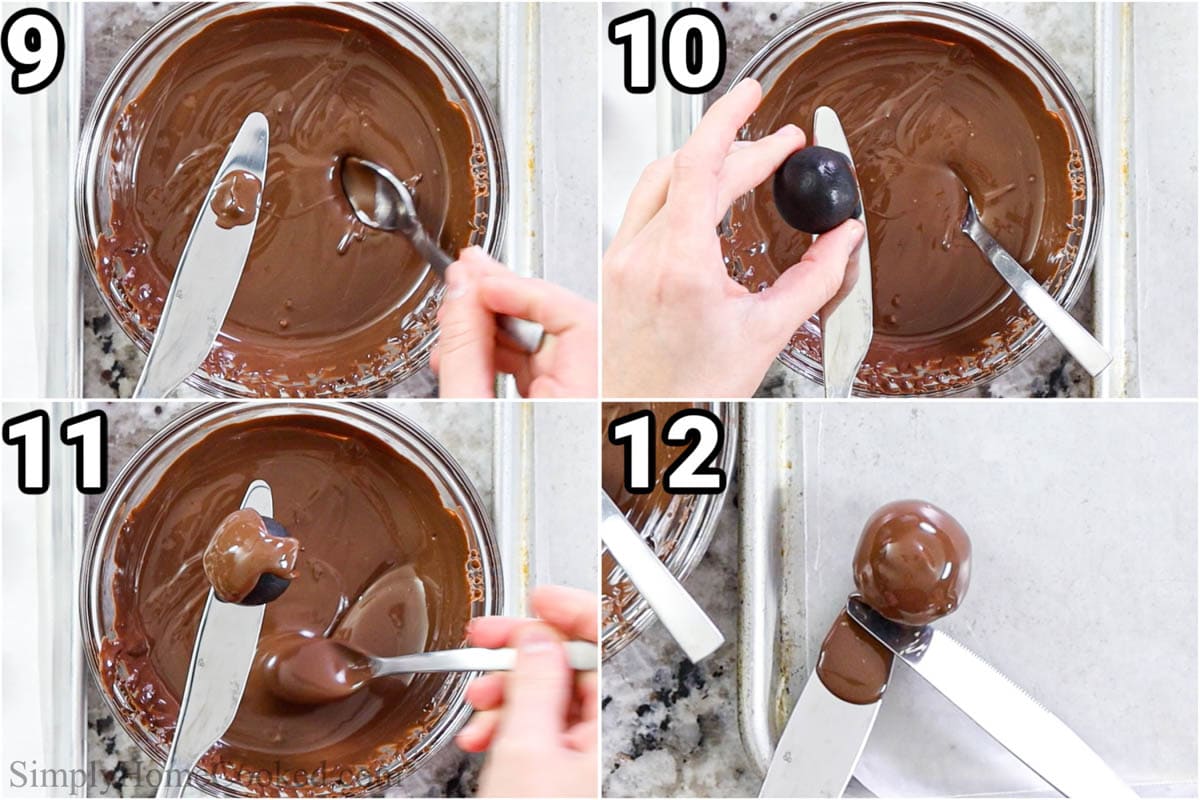
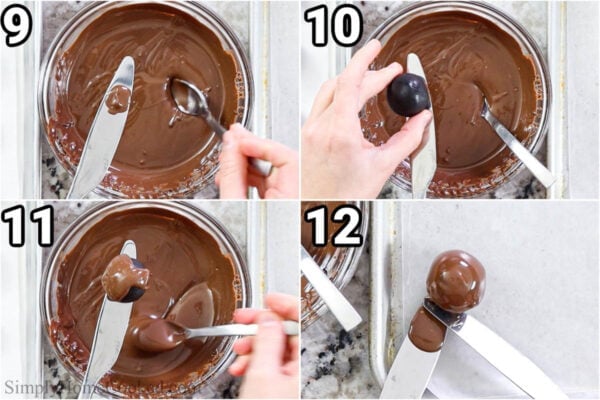
- Cover the balls with chocolate. After the chocolate candy coating is thoroughly melted, begin covering the Oreo truffles in the candy coating.
- Using a knife and spoon completely cover the Oreo balls. I find that the best way to do this is by placing a small amount of melted candy melts onto the thickest part of a butter knife, then placing one Oreo truffle on top of the blob of chocolate (to help hold it in place). Then use a small spoon to scoop melted chocolate over the truffle. Once the truffle is fully coated in chocolate, slide it onto a wax paper-lined baking sheet using another butter knife. Continue doing this with all of the Oreo truffles.
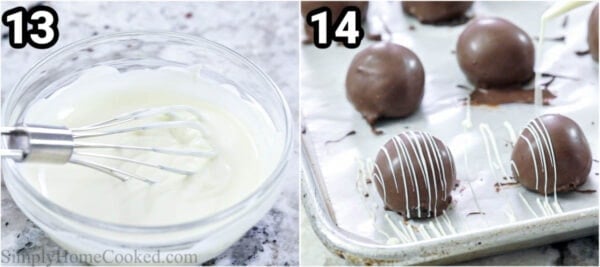
- Drizzle with white chocolate. Once the Oreo truffles are set, melt 5 ounces of white candy melts into a bowl and then pour into a disposable pastry bag and snip off a small part of the end. Then drizzle the melted white candy melts over the Oreo truffles. Let them set for about 20 minutes before serving

Recipe Tips
- If you don’t have a food processor, you can crush up the Oreos by placing them in a gallon sized ziplock bag and beating them with a rolling pin. Then whip the cream cheese in a bowl with an electric hand mixer and then mix in the crushed Oreos.
- Instead of melting the chocolate in intervals, you can use the melt chocolate setting on your microwave if you have that option.
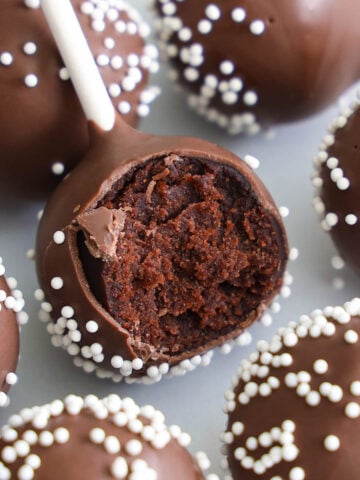
- Make these into cake pops by placing the cold truffles onto a cake pop stick and following my Oreo cake pops recipe as a guide.
- If your candy melts are too thick, you can thin them out with 1-2 teaspoons of coconut oil.
FAQ’s
Since this recipe has cream cheese in it, the truffles will need to be refrigerated. You can keep them in the fridge for up to 3-4 weeks, in an airtight container .
I find that the best way to cover the Oreo balls is by placing a small amount of melted candy melts onto the thickest part of a butter knife, then placing one Oreo truffle on top of the blob of chocolate (to help hold it in place). Then use a small spoon to scoop melted chocolate over the truffle. Once the truffle is fully coated in chocolate, slide it onto a wax paper-lined baking sheet using another butter knife.
Keep them in the fridge for up to 4 weeks. Or you can freeze them in a ziplock bag for up to 2 months. Just thaw in the fridge overnight before serving.

Serving Suggestions
These Oreo Truffles are moist and sweet with a delicious chocolatey coating. They are delicious with cake pops, cookies, cakes, and coffee.
- Cake pops: Serve these truffles with some Chocolate Cake Pops, Oreo Cake Pops (VIDEO), or Vanilla Cake Pops- Starbucks Copycat (VIDEO).
- Cookies: Pair them with some Almond Flour Chocolate Chip Cookies, Double Chocolate Cookies (VIDEO), Chewy Nutella Cookies, or White Chocolate Macadamia Nut Cookies.
- Cakes: Serve them alongside a slice of New York Style Cheesecake, Tiramisu Cake (VIDEO), Chocolate Mousse Cake, or Chocolate Honey Cake (Spartak Cake).
- Beverages: Enjoy these Oreo Truffles with a Pumpkin Spice Latte, Brown Sugar Boba, Iced Caramel Macchiato, or Hot Chocolate.
Make This Recipe in Advance
Make Ahead: You can easily make these Oreo truffles from start to finish ahead of time! Just keep them in the fridge for up to 4 weeks.
Storing: Make sure to store these in an airtight container or ziplock bag when placing it in the fridge. Store no longer than 4 weeks in the refrigerator.
Freeze: To freeze these, you can make them up until the final step of decorating. Once the candy coating has set, you can place them in a gallon-sized ziplock bag and keep in the freezer for up to 2 months.
More Bite-sized Treats!


Watch Video Recipe Here
Full Recipe Instructions

Ingredients
- 6 oz cream cheese
- 36 Oreos
- 10 oz chocolate candy melts
- 5 oz white candy melts for decorating
Instructions
- Start off by placing 36 Oreos (including the filling) into a food processor. Place the lid on, then pulse a few times at high speed or until the Oreos are crushed up to a very fine crumb.
- Then add 6 ounces of softened cream cheese into the food processor. Mix on high speed again, until the cream cheese and Oreos are well combined. It should resemble a chocolate cookie dough texture once it's well mixed.

- Remove the blade from the food processor and transfer the oil truffle mixture into a bowl. Now use a medium-sized cookie scoop or a cake baller to scoop out even amounts of Oreo mixture. Then please it into your hand and roll it out to a ball.

- Then transfer to a baking sheet lined with parchment paper. Once all of the Oreo truffles are shaped, transfer them to the freezer and freeze them for 15 minutes.
- In the meantime please 10 ounces of chocolate candy melts into a microwave-safe bowl and melt the chocolate in 20-second intervals with mixing in between.
- After the chocolate candy coating is thoroughly melted, begin covering the Oreo truffles in the candy coating.
- I find that the best way to do this is by placing a small amount of melted candy melts onto the thickest part of a butter knife, then placing one Oreo truffle on top of the blob of chocolate (to help hold it in place). Then use a small spoon to scoop melted chocolate over the truffle. Once the truffle is fully coated in chocolate, slide it onto a wax paper-lined baking sheet using another butter knife. Continue doing this with all of the Oreo truffles.
- Once the Oreo truffles are set, melt 5 ounces of white candy melts into a bowl and then pour into a disposable pastry bag and snip off a small part of the end. Then drizzle the melted white candy melts over the Oreo truffles. Let them set for about 20 minutes before serving.
Notes
- If you don’t’ have a food processor, you can crush up the Oreos by placing them in a gallon-sized ziplock bag and beating them with a rolling pin. Then whip the cream cheese in a bowl with an electric hand mixer and then mix in the crushed Oreos.
- If your candy melts are too thick, you can thin them out with 1-2 teaspoons of coconut oil.
- Make these in advance up until the final step of decorating. Then keep them in an airtight container in the fridge for up to 4 weeks or freeze for up to 2 months.
Nutrition

- Roasted Green Beans - December 13, 2025
- Brown Butter Chocolate Chip Cookies - December 8, 2025
- The Best Chocolate Salami - November 22, 2025

Esther says
I just answered my own question by going back and reading your FAQ 😄
Dina says
Glad you found the answer in the blog post, Esther. Let me know if you have any more questions. I hope you love the recipe 🙂
Esther says
I found your recipe after I had trouble with another one and am looking forward to trying it. I still had some truffles to coat and I used your technique for those-looked much better! How long do these stay good in the fridge?
Marcia says
Outstanding! These are so simple to make…yet both elegant and delicious!
Dina says
Thank you so much, Marcia! I am so glad that you loved this recipe! I really appreciate your taking the time to leave your feedback 🙂
Anna Gonzales says
So Delicious 🙂 Thank you!!!
Dina says
You are very welcome Anna! Very happy to hear you loved these Oreo truffles! Thank you so much for taking the time to leave your feedback and I hope you find many more delicious recipes on my blog 🙂