This Sourdough Pizza Dough recipe creates a delicious pizza crust that has a slight tang and a chewy, airy texture. Add your favorite toppings for a meal you’ll love.

Table Of Contents
Recipe Details
I love homemade pizza and this Sourdough Pizza Dough recipe is one of my favorites. It takes some time, but the results speak for themselves. This makes a pizza that’s got delicious flavor and texture. You’re going to love it.
- TASTE: This recipe makes a pizza that has a mildly tangy flavor that’s unique. With just a touch of salt, it’s perfect for any toppings.
- TEXTURE: Airy and chewy, this dough puffs up just right to hold your sauce, cheese, and toppings.
- TIME: This will take 1 day and 5 hours to be ready. But there is only 15 minutes of actual cook time.
- EASE: With only a few simple ingredients, this recipe is easy to make. You’ll be surprised by how easy it is to wow family and friends with your homemade pizza.
What You’ll Need
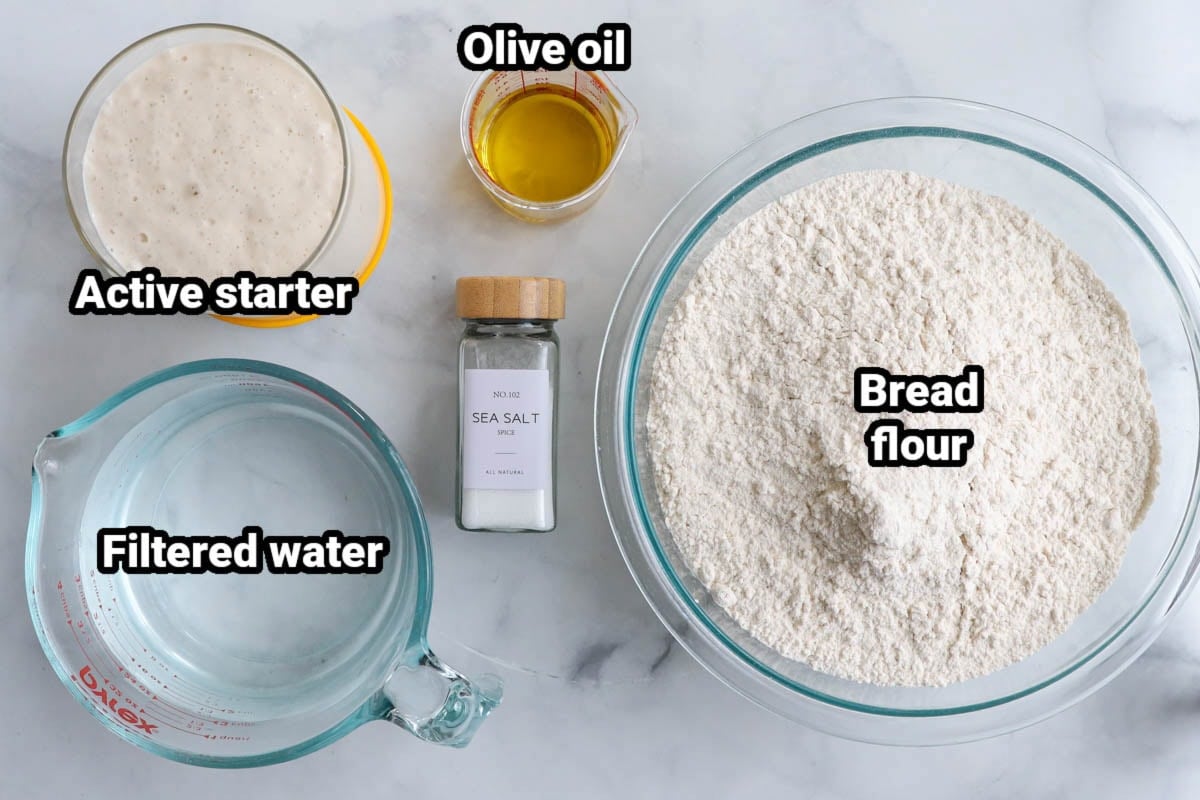
Ingredient Notes
- Bread flour– This flour has more protein and gluten, making the crust chewier, airier, and rise taller.
- Active starter- This yeast mixture will help the dough rise.
- Filtered water- You want to use filtered water because this removes the chlorine and chloramine that can kill the yeast, leaving sourdough flat and dense.
- Olive oil- This ingredient adds a more tender texture to the bread.
- Sea salt- For a bit of flavor.
Add-ins and Substitutions
- Use other flour- You can use all-purpose flour for this recipe as well, but it will result in a denser sourdough because of the lower gluten content.
- Add cornmeal- Adding cornmeal to the pizza dough gives the crust a little crunch.
- Add some garlic powder- For a garlicky flavor to complement your toppings, add some garlic powder to the dough.
How to Make Sourdough Pizza Dough
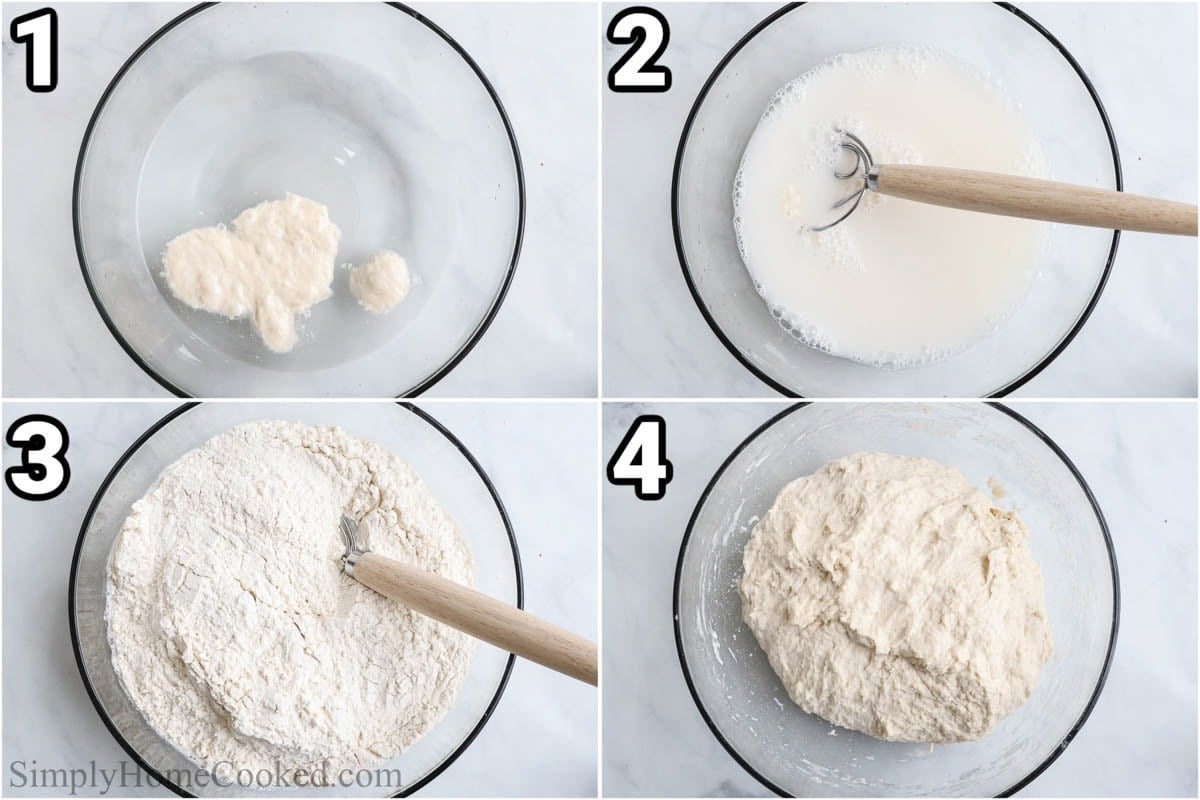
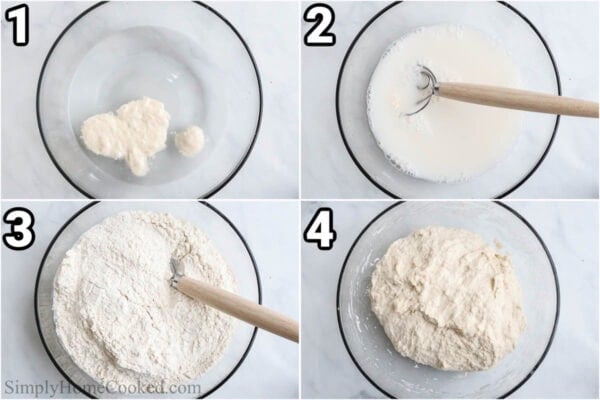
- Mix starter and water. In a large mixing bowl, add the active, ripe sourdough starter and cold water.
- Whisk together. Whisk together using a dough whisk or wooden spoon until the starter is fully dissolved and the mixture looks milky and evenly combined. Make sure there are no large clumps of starter remaining.
- Add flour (Autolyse Stage). Add the flour to the bowl. Mix with a dough whisk or your hands until no dry flour remains. The dough will look shaggy and rough…that’s exactly what you want at this stage.
- Let it rest. Cover the bowl with a tea towel and let the dough rest for 30–45 minutes at room temperature. This rest period is called the autolyse and allows the flour to fully hydrate and begin gluten development.
Pro Tip: Cold water with the starter helps control the dough temperature which allows you to control the fermentation and gluten development. This all affects the texture and flavor.
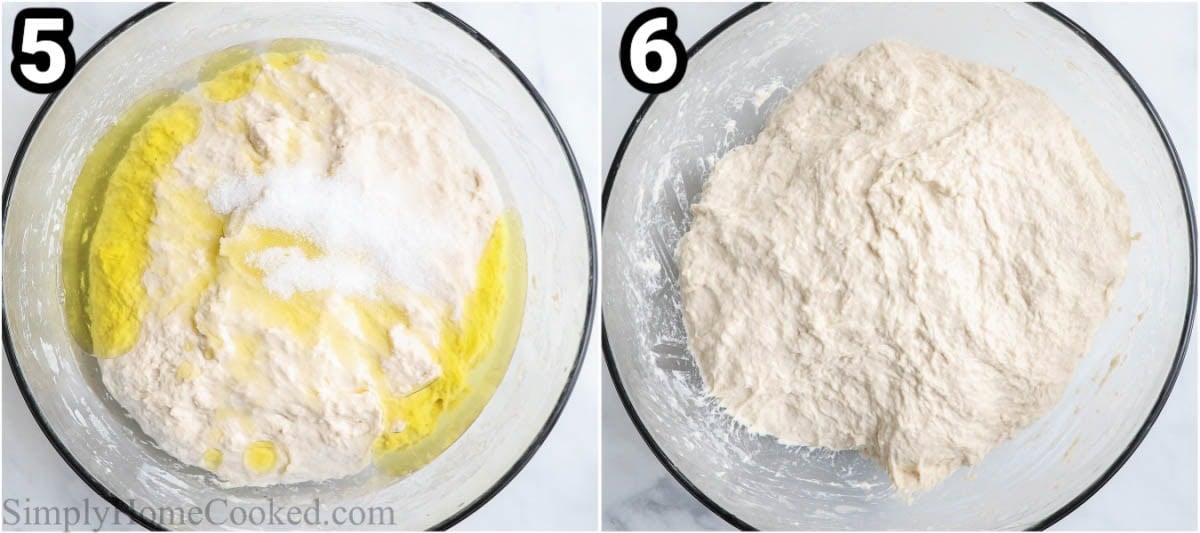
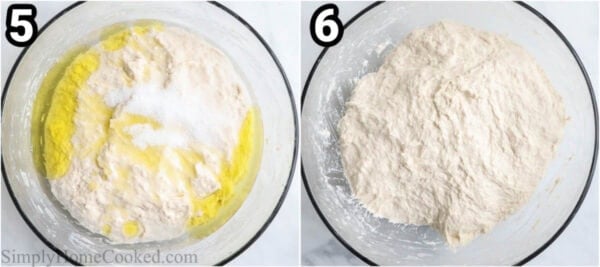
- Add salt and additional water and olive oil. After the autolyse, sprinkle the salt over the dough along with the olive oil, and additional water.
- Fold the dough to combine. Using your hands, gently squeeze and fold the dough to incorporate the salt, oil, and water. It will feel slippery at first. Just keep folding and pinching until the water is absorbed and the dough becomes cohesive, smoother, and elastic. This step may take 3–5 minutes.
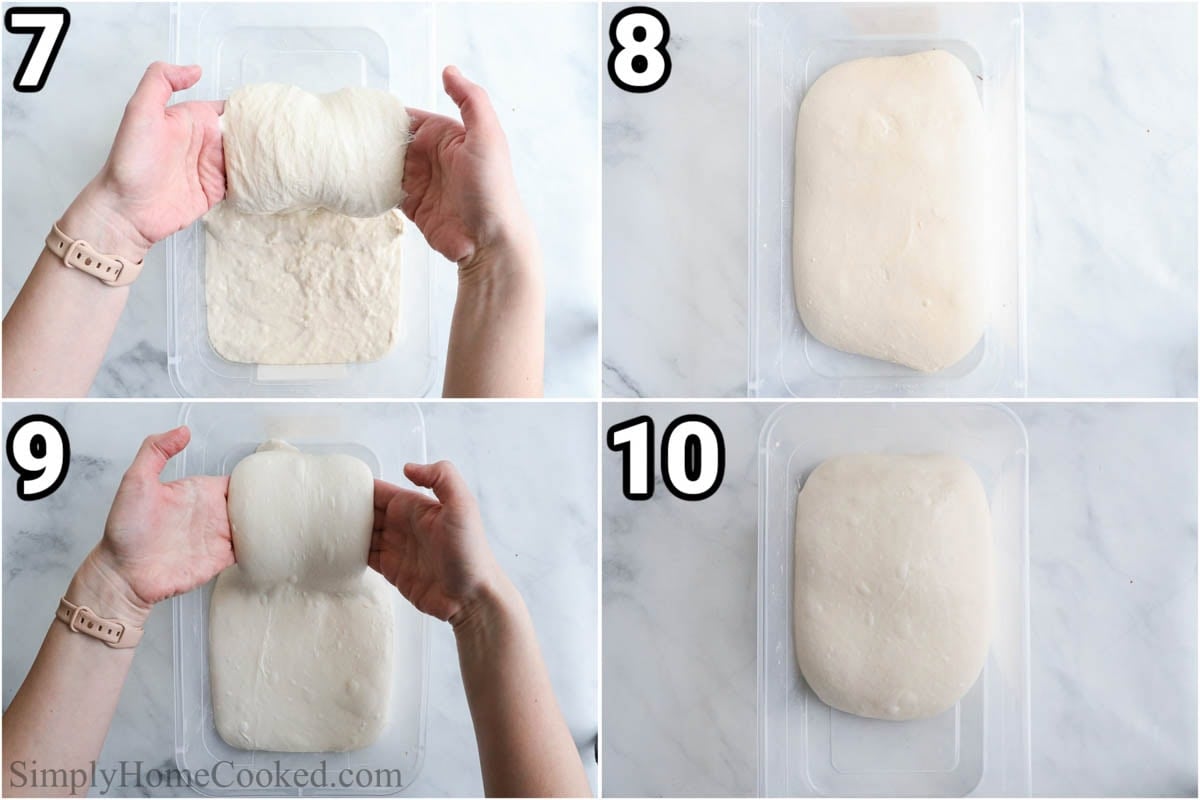
- Let it rest again. Now spray a plastic container/bin with olive oil and transfer the dough to the container. Cover and let is rest for 30 minutes at room temperature.
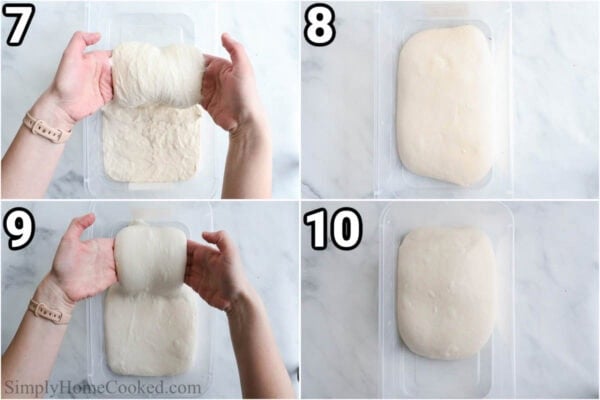
- Stretch and fold. With wet hands, grab one side of the dough, stretch it upward until you feel resistance, then fold it over onto itself. Rotate the container and repeat on all four sides. This method is called coil folds.
- Repeat. Now repeat this for a total of 6 times with 30 minutes of resting in between each stretch/fold.
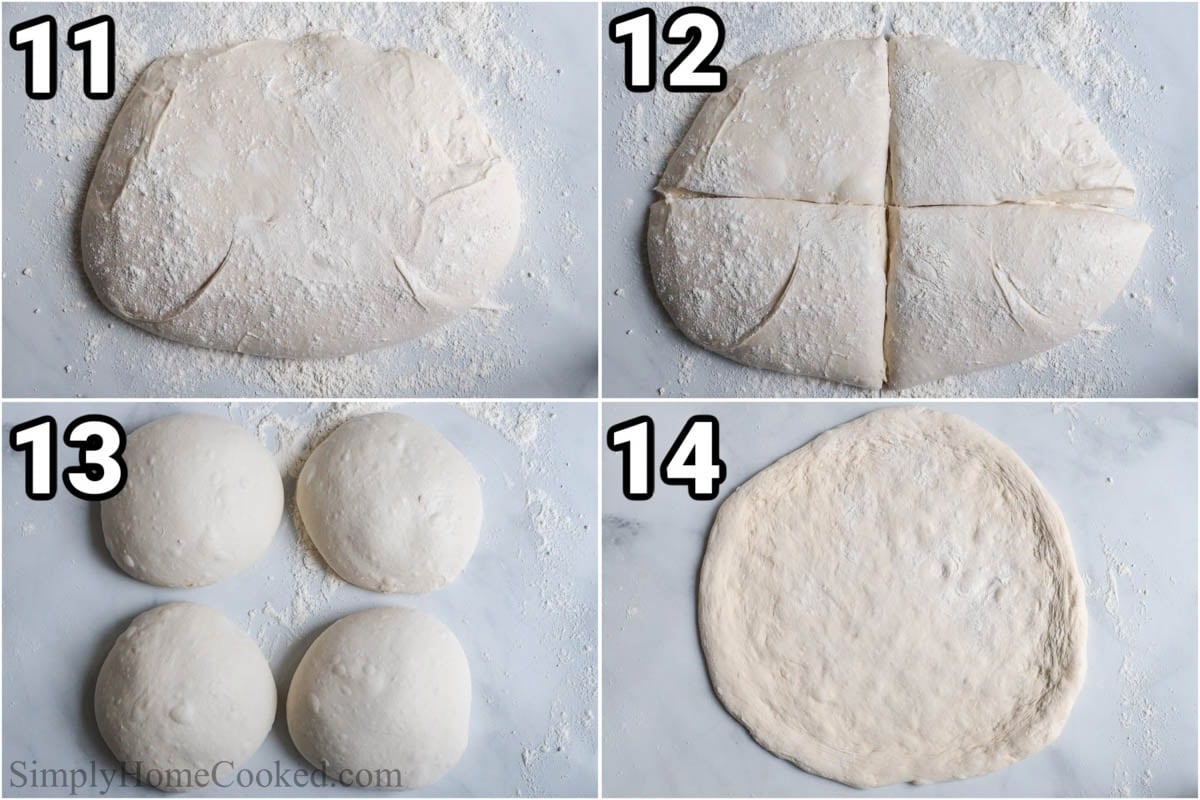
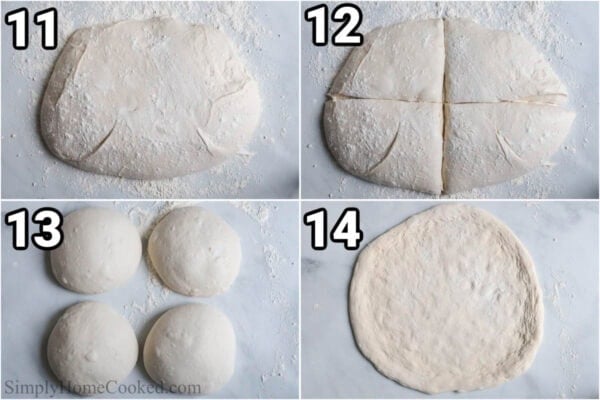
- Divide and refrigerate. Turn the dough out onto a lightly floured surface. Divide into 4 equal portions. This will make a total of 4 (12 inch) pizzas. If this is too much for you, you can freeze some of the dough balls after the 24 hour fridge bulk fermentation.
- Allow it to ferment. Place the dough pieces into a floured or greased container. Cover and refrigerate for 24-72 hours for “bulk fermentation”. This long fermentation will give it extra flavor.
- Bring it to room temperature. Remove the dough balls from the refrigerator 30-40 minutes before baking. You may need to leave the dough out longer if it didn’t proof enough before refrigeration. Keep the dough covered so it doesn’t dry out.
- Preheat the oven. Place your pizza stone or pizza steel in the oven and preheat at 490-500 for about 1 hour.
- Shape the dough. Gently place the dough onto a well-floured surface and stretch the dough into a round, leaving the outer edge slightly thicker for a puffy crust. You can do this step completely on the countertop, or you can pick it up and stretch the dough with your knuckles like a professional. Totally up to you!
- Transfer the dough. For the next step, you can either use a pizza peel or transfer the dough onto a sheet of parchment paper that is sitting on the back side of a baking sheet.
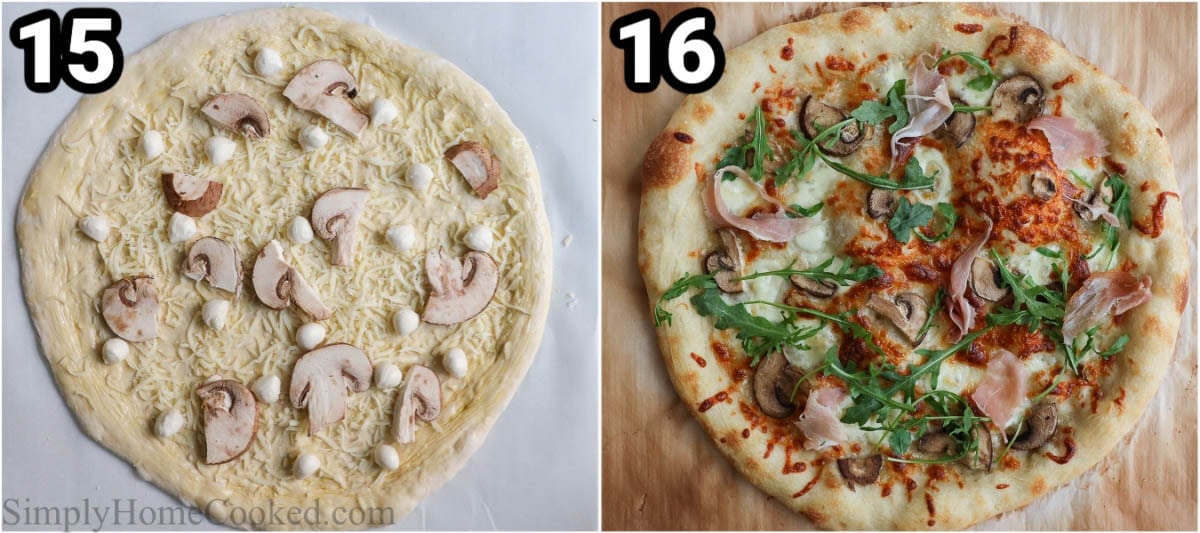
- Add toppings. Now add your favorite sauces & toppings. I like to sometimes only use olive oil as my sauce base, then add shredded mozzarella along with fresh mozzarella pearls, then top it with prosciutto and arugula after baking. Or add some red sauce, mushrooms, and fresh basil.
- Bake. Gently and carefully transfer the pizza together with the parchment paper on top of the hot steel or pizza stone. Bake in the oven for 6-10 minutes. The bake time will vary depending on your oven so keep a close eye on it.
- Serve. Carefully remove the pizza by pulling the parchment paper onto a clean baking sheet or wood cutting board. Slice and enjoy!
Recipe Tips
- Grease the bowl- Make sure to grease the bowl that the dough rises in so that it doesn’t stick to it, losing some of your dough.
- Cover it with plastic wrap- Keeping the air by the dough warm will help it rise. It will also keep it from drying out during the resting periods
- Use a dough hook- If you prefer, you can mix the dough in a stand mixer with a dough hook attachment for convenience.
- Handle the dough gently– Avoid popping air bubbles when you’re shaping it to maintain a light, airy crust.

FAQs
During fermentation of the dough, it is best to let it go for 24-72 hours in the refrigerator for the best texture and flavor of your pizza.
The dough might be tearing because it has not rested long enough or it is too cold. Let it sit at room temperature for 1-2 hours, as cold dough is harder to stretch and therefore more likely to tear.

Serving Suggestions
This Sourdough Pizza Dough recipe makes a super tasty pizza that everyone will love. Serve it with breads, salads, soups, and vegetables.
- Breads: Serve a slice of your pizza with some Copycat Pizza Hut Breadsticks, Cornbread Muffins, Focaccia Bread, or Easy Khachapuri (VIDEO).
- Salad: Enjoy it with a Spinach Salad, Antipasto Salad, Caprese Salad, or Cucumber Tomato Feta Salad.
- Soups: Pair it with a bowl of Tortellini Soup, Baked Potato Soup, or Chicken Wild Rice Soup.
- Vegetables: Serve your pizza with some Crispy Air Fryer Broccoli, Sauteed Garlic Asparagus, Air Fryer Green Beans, or Roasted Air Fryer Vegetables.
Make This Recipe in Advance
Make ahead: Since this recipe needs both a day of fermentation and some hours spent resting, it is best to make it at least a day ahead of when you plan to cook and serve it.
Storing: This homemade dough can be stored in the fridge for up to 2 weeks, tightly wrapped in plastic wrap and in an airtight container.
Freeze: You can freeze this pizza dough, but it may lose some rise. It is better to freeze baked pizza or freeze the dough balls shortly after they are made and before the final rise.
More Delicious Pizzas!


Full Recipe Instructions

Sourdough Pizza Dough recipe
Equipment
- 1 pizza steel or pizza stone
Ingredients
- 150 g active starter
- 700 g very cold water filtered or bottled
- 110 g additional cold water after autolyse
- 1000 g bread flour highly recommend King Arthur
- 25 g sea salt
- 50 g olive oil
Instructions
- Mix starter + water- In a large mixing bowl, add the 150g active, ripe sourdough starter and 700g cold water. Tip: cold water helps control the dough temperature which allows you to control the fermentation and gluten development. This all affects the texture and flavor.
- Whisk together using a dough whisk or wooden spoon until the starter is fully dissolved and the mixture looks milky and evenly combined. Make sure there are no large clumps of starter remaining.
- Add Flour (Autolyse Stage)- Add the 1000g flour to the bowl. Mix with a dough whisk or your hands until no dry flour remains. The dough will look shaggy and rough…that’s exactly what you want at this stage.
- Cover the bowl with a tea towel and let the dough rest for 30–45 minutes at room temperature. This rest period is called the autolyse and allows the flour to fully hydrate and begin gluten development.

- Add Salt + Additional Water + olive oil- After the autolyse, sprinkle the 25g salt over the dough along with 50g olive oil, and 110g additional water.
- Using your hands, gently squeeze and fold the dough to incorporate the salt, oil, and water. It will feel slippery at first. Just keep folding and pinching until the water is absorbed and the dough becomes cohesive, smoother, and elastic. This step may take 3–5 minutes.

- Now spray a plastic container/bin with olive oil and transfer the dough to the container. Cover and let is rest for 30 minutes at room temperature.
- Stretch & folds- With wet hands, grab one side of the dough, stretch it upward until you feel resistance, then fold it over onto itself. Rotate the container and repeat on all four sides. This method is called coil folds.
- Repeat- now repeat this for a total of 6 times with 30 minutes of resting in between each stretch/fold. Note: Make sure to cover the dough during the resting periods to keep it from drying out.
- Divide and refrigerate- Turn the dough out onto a lightly floured surface. Divide into 4 equal portions. This will make a total of 4 (12 inch) pizzas. If this is too much for you, you can freeze some of the dough balls after the 24 hour fridge bulk fermentation.
- Place the dough pieces into a floured or greased container. Cover and refrigerate for 24-72 hours for “bulk fermentation”. This long fermentation will give it extra flavor.
- Bring to Room Temperature- Remove the dough balls from the refrigerator 30-40 minutes before baking. You may need to leave the dough out longer if it didn’t proof enough before refrigeration. Keep the dough covered so it doesn’t dry out.
- Place your pizza stone or pizza steel in the oven and preheat at 490-500 for about 1 hour.
- Shape – Gently place the dough onto a well-floured surface and stretch the dough into a round, leaving the outer edge slightly thicker for a puffy crust. You can do this step completely on the countertop, or you can pick it up and stretch the dough with your knuckles like a professional. Totally up to you!
- Transfer the dough- For the next step, you can either use a pizza peel or transfer the dough onto a sheet of parchment paper that is sitting on the back side of a baking sheet.
- Toppings- now add your favorite sauces & toppings. I like to sometimes only use olive oil as my sauce base, then add shredded mozzarella along with fresh mozzarella pearls, then top it with prosciutto and arugula after baking.
- Bake- gently and carefully transfer the pizza together with the parchment paper on top of the hot steel or pizza stone. Bake for 6-10 minutes. The bake time will vary depending on your oven so keep a close eye on it.
- Carefully remove the pizza by pulling the parchment paper onto a clean baking sheet or wood cutting board. Slice and enjoy!

Notes
- Grease the bowl- Make sure to grease the bowl that the dough rises in so that it doesn’t stick to it, losing some of your dough.
- Cover it with plastic wrap- Keeping the air by the dough warm will help it rise. It will also keep it from drying out during the resting periods
- Use a dough hook- If you prefer, you can mix the dough in a stand mixer with a dough hook attachment for convenience.
- Handle the dough gently– Avoid popping air bubbles when you’re shaping it to maintain a light, airy crust.
Nutrition

- Egg Roll in a Bowl - March 24, 2026
- Garlic Butter Chicken Bites - March 19, 2026
- Cedar Plank Salmon - March 16, 2026

Leave questions and feedback here